Bosch router table: 7 setup tips to avoid mistakes
Have you ever set up a router table and found your cuts just a little off? Small setup errors can wreck a project. These seven tips show how to set your Bosch router table so the plate, fence, and router are stable. Follow simple checks for mounting, leveling, wiring, and dust control to get steady, safe cuts every time.
Table of Contents
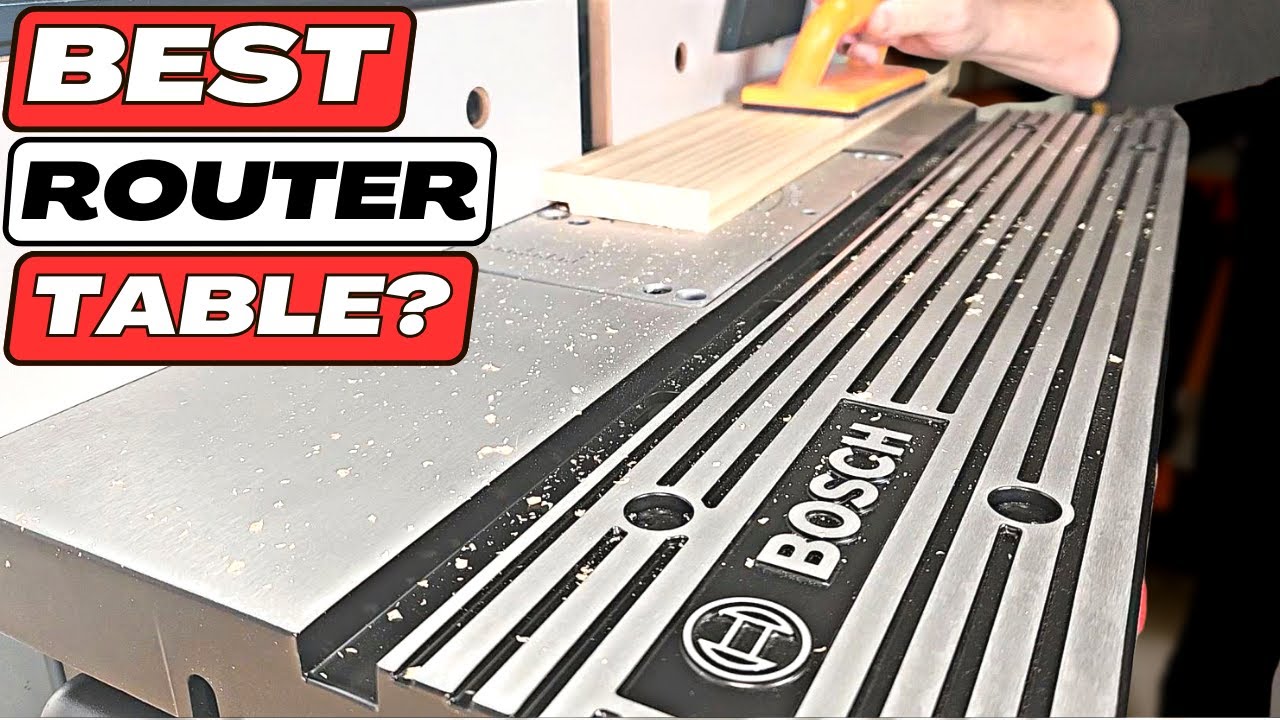
A Bosch router table gives you straighter edges, cleaner joinery, and safer routing because your work stays supported and your hands stay farther from the bit. This guide focuses on the Bosch benchtop router table RA1181 and walks you through setup details that prevent wobble, snipe, and misalignment.
Bosch router table quick overview
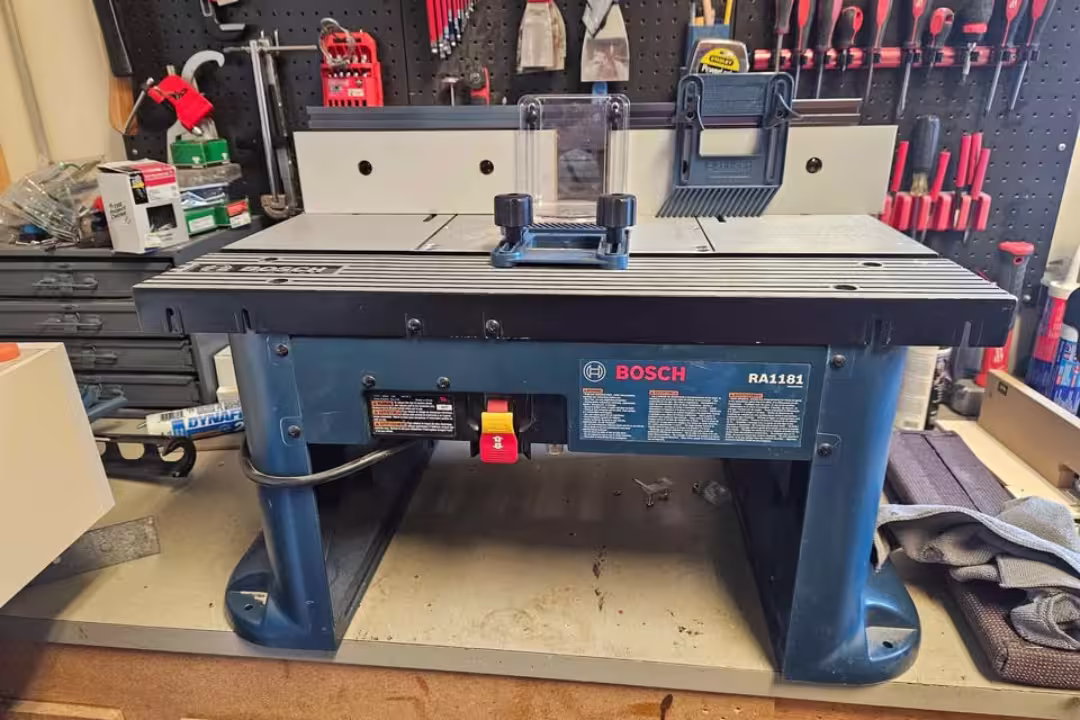
The bosch benchtop router table RA1181 is built for small shops and mobile work because it packs a full fence system, dust collection, and an easy-to-mount insert plate into a compact footprint. Bosch highlights the RA1181’s design and intended use on the RA1181 product page.
RA1181 key features
This bosch table router setup stands out because the fence gives you repeatability, the top stays stable, and the dust port helps you see the cut line longer. If you want a proven starting point for a router table for Bosch router setups, the RA1181 is a common pick for 2.25 HP-class routers.

Bosch RA1181 Compact Benchtop Router Table
- Sturdy laminated MDF top for stable, vibration-free routing
- Adjustable dual fence for precise, repeatable cuts
- Built-in dust collection port keeps the workspace cleaner
- Easy router mounting and insert plate for quick setup
- Compact footprint designed for small shops and portability
Compatibility and specs
Most people buy the bosch router for table use with a mid-size fixed-base router, and the RA1181’s pre-drilled plate makes that easier for popular models (especially Bosch’s 1617/1618 family). Your goal is simple: confirm the hole pattern matches your router (or plan an adapter), then confirm the table has enough clearance for the motor, collet access, and the power cord path.
| Spec / check | What to verify before buying or mounting |
|---|---|
| Router power class | Up to ~2.25 HP class is a common match for benchtop tables; avoid overloading with oversized panel-raising cuts. |
| Mounting plate hole pattern | Confirm your model is listed in the manual chart, or budget for an adapter plate/base. |
| Above-table access | Check if your router/base supports above-table height adjustment and bit changes. |
| Bench space | Plan outfeed and infeed room so long stock doesn’t tip and pull away from the fence. |
| Dust collection hookup | Make sure your shop vac or extractor hose matches the fence port size you’ll use most. |
If you’re still comparing table styles, this router table guide breaks down what matters for cabinet-style vs benchtop setups, so you don’t buy features you won’t use.
Common setup pitfalls
Most accuracy problems come from three mistakes: tightening the frame too soon, leaving the mounting plate slightly proud or low, and mounting a router that doesn’t fully match the pre-drilled holes. The fix is to slow down during assembly, verify flatness with a straightedge, and do a final re-check after the router’s weight is on the plate.
Assemble frame before final tightening
The quickest path to a square, steady bosch router table is to leave every bolt slightly loose until the legs, panels, and top are all sitting where they want to sit. This small step prevents twisting that later shows up as fence drift, vibration, or a “rocking” table on your bench.
Bolt sequence
Use a simple hand-tight sequence so parts self-align before you lock them in place. The Lowe’s-hosted RA1181 manual spells out the assembly order and torque cautions; keep it open while you work: owner’s manual PDF.
- Attach the legs/sides to the tabletop and thread all bolts in a few turns.
- Install the front panel and switch panel parts so the frame “squares up” naturally.
- Snug bolts in a cross pattern (front-left, rear-right, front-right, rear-left).
- Do a final snug pass after the table sits flat on your bench.
Alignment checks
Before you tighten anything fully, check two points: the table doesn’t rock on a flat bench, and the fence mounting area sits square to the miter slot area. If your bench isn’t flat, shim the table temporarily so you don’t “build in” twist while tightening.
A quick way to avoid false readings is to place the table on the same surface you’ll use long-term, such as a dedicated station or a stiff top; if you’re building that station soon, use a flat temporary base until your permanent bench is ready.
Over-tightening mistakes
Over-tightening creates new problems: stripped threads, bowed panels, and frame pull that makes the switch panel sit crooked. Stop at “snug plus a small nudge,” then rely on periodic re-tightening after the first few sessions instead of forcing hardware during first assembly.
Level the mounting plate flush
A router table can look perfect and still cut poorly if the insert plate isn’t dead flush. Any lip (high or low) catches stock, changes feed pressure, and can telegraph as chatter or a tiny step in edge profiles.
Leveling screws
Use the plate’s leveling screws in small increments and treat it like leveling a machine bed: adjust one point, then re-check the whole perimeter. Start with the plate slightly low, then bring it up to flush height so the plate stays supported rather than “teetering” on a couple of high screws.
Straightedge test
Lay a straightedge across the opening in at least four directions (front-to-back, left-to-right, and both diagonals). If you don’t have a machinist straightedge, use the edge of a known-straight level or a jointed board, then watch for light gaps or rocking as you slide the straightedge across the plate edges.
Recheck after install
Once the router is mounted, re-check because the router’s weight can shift the plate a hair and expose a tiny ridge. Take two minutes to correct it now; it saves you from chasing “mystery” cut marks later.
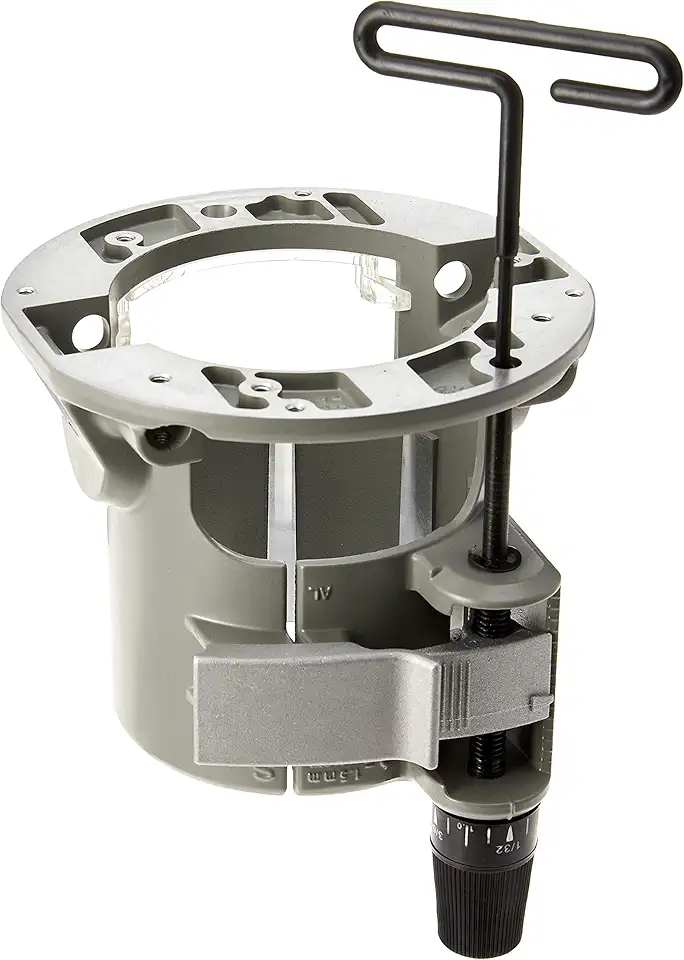
Mount the right router securely
The RA1181 works best when the router bolts up with full contact and no slop in the hole pattern. A loose mount becomes a vibration problem first, then an accuracy problem, and it can also make bit height drift mid-pass.
Pre-drilled hole match
Confirm your router model matches the pre-drilled pattern before you remove handles or bases. For the Bosch 1617 family, this usually means a straightforward bolt-on that turns the RA1181 into a router table for bosch router setups with minimal fuss.
Adapter plate options
If your router doesn’t match, use an adapter solution instead of “making it work” with odd screws or enlarged holes. A proper adapter plate keeps the router centered, spreads load, and reduces flex—exactly what you want for repeatable joinery and clean edges.
Cord clearance
Before you seat the plate, route the power cord so it won’t pinch, rub on sharp edges, or hang where stock can snag it. Leave enough slack for height changes, and keep the cord away from the bit area for safer operation.
These parts are common picks for the RA1181 and a matching Bosch router setup.
Bosch RA1181 Compact Benchtop Router Table
- Sturdy laminated MDF top for stable, vibration-free routing
- Adjustable dual fence for precise, repeatable cuts
- Built-in dust collection port keeps the workspace cleaner
- Easy router mounting and insert plate for quick setup
- Compact footprint designed for small shops and portability

Bosch 1617EVSPK Plunge & Fixed-Base Router
- Includes both plunge and fixed bases for maximum routing flexibility
- 2.25 HP motor offers reliable power for tough cuts
- Variable speed control adapts to different bits and materials
- Soft-start and durable construction for long-lasting use
- Compatible with many router tables and accessories

Bosch Adapter Plate 2610938414
- Precision-cut adapter plate for secure router mounting
- Easy bolt-on installation saves setup time
- Rigid construction minimizes flex for accurate routing
- Pre-drilled hole pattern matches common insert plates
- Durable finish resists wear and keeps alignment true
Set up the fence for repeatability
The fence is where a benchtop setup either feels “toy-like” or shop-ready. Take time here and you’ll get cleaner profiles, more consistent dados, and less sanding because the stock stays supported and guided.
Fence assembly
Assemble the fence and mount it loosely so it can slide and self-square before final tightening. If you need extra work-holding help for repetitive runs, add clamps that won’t shift under vibration; this types of clamps guide helps you pick clamps that stay put on fences and jigs.
Faceplate alignment
Set both faceplates so the gap around the bit is as small as practical without rubbing. A tight opening improves chip control and reduces tear-out by supporting fibers right next to the cut.
Featherboards and inserts
Use featherboards when the cut wants to lift or drift, like edge-forming on narrow stock or routing long pieces that can bow. Keep pressure firm and consistent, but don’t crush the stock; the goal is steady feed and full fence contact.
- Place the infeed featherboard just before the bit to prevent chatter.
- Add an outfeed featherboard when a profile cut reduces reference surface.
- Pick the smallest insert opening that clears the bit for better support.
Wire the switch and test safely
The front power switch is a big safety upgrade on a bosch benchtop router table ra1181 because you can shut down fast without reaching under the table. Treat your first power-up like a test cycle, not a production cut.
Switch mounting
Mount the switch so the paddle faces you squarely and doesn’t bind against the panel. Leave slack in the cords so vibration doesn’t tug connections loose, and make sure the plug path doesn’t interfere with fence travel.
Power-on sequence
Start with the router’s own switch set to OFF, then plug the router into the table switch outlet, then plug the table into the wall. Flip the router to ON (so the table switch controls it), then use the front paddle as your normal start/stop for controlled starts.
Bit access window
Use the access window and above-table features (if your base supports them) to change bits without fighting the table. Before you cut, spin the bit by hand to confirm nothing rubs, and confirm the collet is fully seated for clean runout.
Use dust collection and correct inserts
Dust collection isn’t just for comfort; it affects cut quality because you can see the line and keep the fence area from packing with chips. Hook up the vac from the first test pass and treat clear visibility as part of accuracy.
Dust port hookup
Connect a shop vac or extractor to the fence dust port and check airflow before routing hardwood. If suction seems weak, check for hose kinks and keep the fence opening tight around the bit to improve chip capture.
Insert sizing
Pick an insert that leaves the smallest safe opening around the bit. A tighter opening supports the workpiece near the cut and helps prevent small offcuts from tipping into the hole, which improves edge consistency on narrow parts.
Visibility and control
If you still struggle to see the cut, move your light so it skims across the tabletop and throws shadows into low spots; it makes plate lips and stock gaps easier to spot. Planetary health guidance also backs dust control in shops—wood dust can harm lungs—so a vac and mask plan is smart; see NIOSH guidance on wood dust for practical background.
Final checks and long-term maintenance
A bosch router table stays accurate when you treat setup as an ongoing habit, not a one-time job. Your main goal is to catch small shifts early—right after the first session and then on a simple schedule.
Post-first-use relevel
After your first real routing session, re-check plate flushness and fence squareness. Heat, vibration, and the router’s weight can settle parts slightly, so a quick straightedge pass keeps your next cuts predictable.
Fastener retighten
Re-tighten key fasteners after a few hours of use, then periodically after transport or big temperature swings. Focus on the leg/frame bolts, fence knobs, and plate retention points so nothing loosens into a hidden wobble.
Insert storage
Keep inserts in a labeled container near the table so you don’t “make do” with the wrong opening. Clean pitch off inserts and the plate edge so they seat fully; a clean seat helps maintain flat registration every time you drop the plate back in.
Bosch RA1165 Under-Table Router Base (1617/1618)
- Under-table base converts your router for above-table routing convenience
- Above-table hex key allows quick bit changes without removing the router
- Secure mounting designed for 1617 and 1618 series compatibility
- Improves stability and control for table-mounted routing
- Durable build for reliable, long-term shop use
FAQs
Which Bosch Router Table Is Best For Beginners And Small Workshops?
For beginners and small workshops, choose a compact benchtop or combo router table designed for stability and easy setup.
Look for a model with an aluminum or MDF top, integrated dust collection, a miter slot, and a clear fence to keep setups simple. If you have a specific Bosch router, pick an insert plate or adapter that fits that router’s base.
How Do I Mount A Bosch Trim Or Plunge Router To A Router Table Insert Plate?
Mount a Bosch trim or plunge router by using the router base as a template to mark and drill holes in the insert plate, then secure it with matching bolts or an adapter ring.
Use a universal adapter plate if the hole pattern doesn’t match, check bit clearance and fence alignment, and tighten clamps evenly.
What Dust Collection Options And Accessories Work With Bosch Router Tables?
Bosch router tables work with shop vacs, small cyclone collectors, and 1-1/4-inch or 2-1/2-inch dust ports commonly used on router tables.
Add a dust hood, brush skirt, blast gate, or hose adapter to improve capture; larger hoses and a stronger collector give better performance for heavy routing.
Can Bosch Routers Be Used With Third-Party Router Table Fences, Lifts, And Insert Plates?
Yes — Bosch routers are typically compatible with third-party fences, lifts, and insert plates when mounting patterns or adapter rings match and there is sufficient clearance.
Measure bolt patterns, motor/base size, and bit clearance before buying, and consider universal adapter plates or custom templates for a secure fit.