Machines for Sanding: Choose the Right Sander for Every Job
Not sure which sander to pick for your next project? This guide to machines for sanding breaks down the common types and what each does. You’ll learn when to use a Belt Sander, Random Orbital Sander, Mouse Sander, Drywall Sander, or Disc Sander. Short tips on grit, dust control, and safety help you get cleaner, faster results.
Table of Contents
Machines for sanding help you remove material fast, smooth surfaces, and prep for paint or finish with less effort than hand sanding. This guide breaks down the main sander types and shows how to pick the right sanding machine for wood, drywall, metal, and detail work.
Machines for Sanding: Key Categories
Manual vs electric
Manual sanders give fine control on edges, profiles, and quick touch-ups, yet they’re slow on large panels. Electric machines for sanding remove stock faster and keep results more consistent across wide surfaces, which matters on doors, tabletops, and cabinet sides.
For sizing a tool to the job, compare speed metrics across categories: belt sanders often run up to about 380 m/min belt speed, while many random orbital sanders reach 12,000 OPM or more for clean finishing passes. Those benchmarks come from a practical breakdown in types of sanders, and they explain why belts feel “aggressive” and random orbitals feel “controlled.”
Picking the right sanding machine
Match the sander to the surface area, the shape, and the finish level you need, then pick abrasives that step down in grit without skipping too far. A simple way to decide is to start with how much material removal you need: belts for rapid flattening, random orbitals for most wood prep and finish sanding, mouse sanders for corners, drywall sanders for walls, and disc sanders for shaping edges.
| Sander type | Best fit | Beginner risk | Typical grit range |
|---|---|---|---|
| Belt Sander | Fast leveling, stripping, flattening | High (can gouge) | 40–220 |
| Random Orbital Sander | General sanding machine for wood, swirl-free finishing | Low | 80–320 |
| Mouse Sander | Corners, trim, detail profiles | Low–medium | 120–240 |
| Drywall Sander | Walls, ceilings, texture removal | Medium (over-sanding) | 80–180 |
| Disc Sander | Edges, bevels, shaping | Medium (burning on edges) | 60–220 |
If you want a deeper walkthrough for shop setups, see this internal guide on a sanding machine and how it fits into a woodworking workflow.
Belt Sander (Fast stock removal)
Best uses
A Belt Sander shines when you need speed: flatten glued panels, level high spots, strip thick finishes, and shape rough lumber before finer sanding. It can also remove old paint or rust on metal when paired with the right abrasive and a steady hand.
Key specs
Look at motor power, belt size, and adjustable speed because those decide how controllable the tool feels in real use. Many belt sanders sit in a range where belt speed can run from roughly 150 to 380 m/min, which lets you slow down for softer wood or speed up for fast leveling; examples and ranges are outlined in types of sander.
Also check the tracking adjustment (keeps the belt centered), platen quality (helps flattening), and dust port size (helps connect a shop vac). A good sanding machine for wood should feel stable when you set it down, with low vibration and a handle that supports two-handed control.
Pros and cons
Pros: very fast stock removal, great for flattening, and effective on large flat faces. Cons: it’s easy to dig a trench if you tilt the nose or pause in one spot, so even pressure and constant movement matter.
Grit progression
Start coarse only when you need it, then step down in sensible jumps so each grit removes the scratches from the last one. A practical belt-sander path for rough wood is 60 → 80 for flattening, then 120, then switch to a Random Orbital Sander at 150–180 to erase belt lines, finishing at 220 for most clear coats.
For paint stripping, begin around 40–60, then stop once the coating is gone and move to 80–120 to reduce deep scratches. Avoid “skipping” from 60 straight to 220 because you’ll spend more time fighting leftover grooves than you saved by changing belts less often.

3‑in‑1 Mini Belt Sander Kit — Adjustable Speed for Crafts
- Convertible 3-in-1 design for sanding, grinding, and polishing tasks
- Adjustable speed for precise control on delicate projects
- Compact size ideal for hobbyists, jewelry, and model making
- Bench or handheld use adds versatility for different workflows
- Includes accessories in the kit to get started right away
Random Orbital Sander (Swirl-free sanding)
Best uses
A Random Orbital Sander is the go-to pick for furniture, doors, tabletops, and general sanding machine for wood tasks where you want a clean surface without visible pattern marks. It also works well for scuff-sanding between coats and removing light scratches after milling.
Key specs
Check pad size (5-inch vs 6-inch), orbit size (often around 2.5–5 mm), and variable speed, since those control how aggressive it feels. Many models run around 12,000 OPM at top speed, which aligns with the sanding guidance in Choose the Best Power Sander.
Hook-and-loop pads save time because paper swaps take seconds, which helps you follow a tight grit sequence. If you sand softwoods or veneer, pick a tool with a smoother start and strong braking, since pad momentum can cause “pigtails” when you lift off at speed.
Pros and cons
Pros: easy to control, low chance of gouging, and it handles both prep and finishing steps on most projects. Cons: it’s slower than a Belt Sander for heavy flattening, and clogged discs can burnish surfaces instead of cutting, so fresh abrasives matter.
Dust collection
Use discs with matching dust holes, then connect a vacuum if your tool supports it; that keeps the abrasive cutting longer and reduces cleanup. For the best results, pick a disc that matches your finish goal: 120–150 for shaping and scratch removal, 180–220 for pre-finish, and 320 grit for between coats on many film finishes.

Here are a few popular options to compare by pad size, speed control, and dust capture.

SKIL 5” Random Orbital Sander — Cyclonic Dust Collection
- Smooth random-orbit action for fast, even sanding
- Cyclonic dust box captures debris for a cleaner work area
- Comfortable grip reduces hand fatigue during long use
- Includes 3 sanding sheets for immediate projects
- Great for woodworking, refinishing, and DIY touch-ups

MAXXT 6” Brushless Random Orbital Sander — Powerful & Precise
- Brushless 350W motor for longer life and consistent power
- 5mm orbital action delivers smooth, swirl-free finishes
- Variable speed control for fine-tuning material removal
- Includes 6-inch pad and 10 sanding papers for immediate use
- Comfortable palm design for stable, controlled sanding
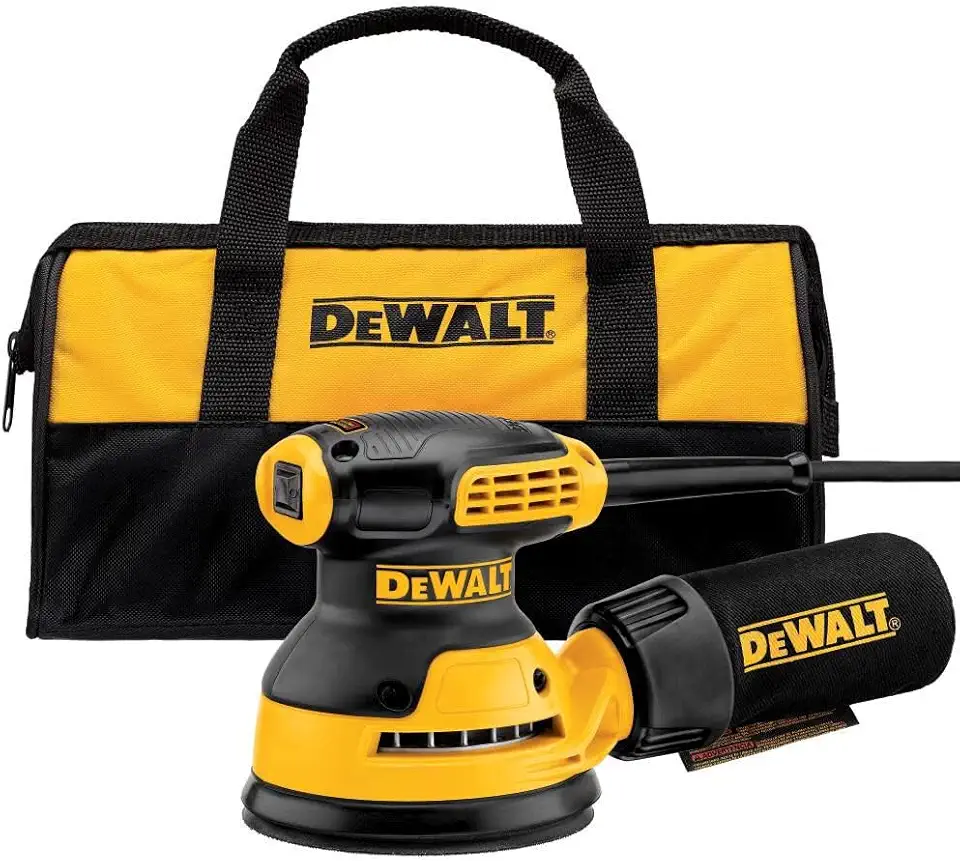
DEWALT 5” Orbital Sander Kit — 3A Professional Finish
- Durable 3 amp motor delivers steady power for professional results
- 12,000 OPM provides fast, consistent sanding performance
- Kit includes accessories for immediate use on a variety of jobs
- Comfortable grip and reduced vibration help steady long sessions
- Hook-and-loop pad enables quick, secure sandpaper changes
Mouse Sander (Detail sanding in tight areas)
Best uses
A Mouse Sander (detail sander) reaches inside corners, along trim, and around profiles that round pads can’t reach. It’s a smart add-on for cabinet face frames, stair parts, window sashes, and small woodworking projects where you want clean edges without hand-sanding every spot.
Key specs
Check OPM, pad tip shape, and whether it supports hook-and-loop sheets or clip-on paper, since that affects your abrasive choices. Many detail sanders run around 13,000 OPM, which is plenty for light-to-medium sanding without removing too much too fast.
Pros and cons
Pros: excellent access to corners, steady one-hand control, and quick touch-ups on small parts. Cons: slow on big panels, and the tip can wear paper fast, so plan on extra pads and replacement sheets if you do lots of corner work.
Best grits
Start at 120 grit for most wood detailing, then move to 150–180 to refine scratches before finish. Use 220 for a last pass on paint-grade trim, but avoid going extremely fine on bare wood if you need stain penetration; over-sanding can reduce absorption and cause blotchy color.
Here are a few detail sanders that work well for corners and tight spaces, depending on attachments and dust capture.

SKIL Corded Detail Sander — Multi-Function Precision Tool
- Compact detail design reaches tight spaces and edges
- Micro-filter dust box helps contain sanding dust
- Three additional attachments expand sanding profiles and access
- Includes 12 sanding sheets so you can start right away
- Corded power delivers consistent performance for precision work

WEN 6301 Palm Detail Sander — Compact Finishing Tool
- Ergonomic palm grip for comfortable one-handed control
- Low-profile body fits into tight areas and edges
- Smooth finishing action ideal for wood and furniture projects
- Built-in dust collection helps keep the workspace cleaner
- Lightweight design reduces user fatigue during extended use

THINKLEARN 13,000 OPM Detail Sander — Compact Mouse Sander
- High 13,000 OPM speed for quick material removal and finishing
- Compact mouse shape reaches tight corners and contours
- Includes 15 sandpapers to handle a range of grits and jobs
- Built-in dust box reduces mess during sanding
- Lightweight and easy to control for furniture and small projects
Drywall Sander (Walls and ceilings)
Best uses
A Drywall Sander is built for large vertical and overhead surfaces like walls, ceilings, and popcorn texture removal. It saves time on full-room finishing because the wide head covers more area per pass than handheld sanders.
Key specs
Look for variable speed, a head that pivots, an extendable handle, and a dust port designed for vacuum hookup. Typical machines run roughly 800–1800 RPM, which helps you slow down near corners and speed up across open fields.
Pros and cons
Pros: fast coverage, less ladder work, and cleaner sanding when paired with a shop vac. Cons: bulky in closets or tight rooms, and beginner users can leave low spots by dwelling in one area, so keep a steady sweep and check with raking light.
Paper types and grits
Use mesh or “grid” abrasives when you want better dust flow through the head, and use standard discs when you want a more familiar cut. For most finishing work, start around 120 grit, move to 150, and stop once seams disappear under strong side lighting; dropping to 80 makes sense for heavy texture but can leave deep scratches that take time to remove later.

KUPERIA Drywall & Popcorn Ceiling Sander with Extendable Handle
- Powerful 8.5 amp motor to tackle heavy drywall and texture removal
- Seven variable speeds (800–1800 RPM) for precise control
- Extendable handle and LED light make overhead work easier and safer
- Includes basic and grid sandpapers to cover common jobs
- Designed for efficient popcorn ceiling and drywall surface prep
Disc Sander (Edges and shaping)
Best uses
A Disc Sander is a strong pick for shaping, refining miters, squaring end grain, and cleaning up edges where a handheld tool feels unstable. It also works on plastics and non-ferrous metals with the right abrasive and controlled pressure.
Key features
Focus on a solid table with angle adjustment, disc size (often 6-inch on compact units), and a reliable miter gauge if you plan repeatable angles. A stable machine base reduces chatter and helps you get square edges without chasing the workpiece.
Pros and cons
Pros: consistent shaping, great control for small parts, and quick grit swaps for step-by-step refinement. Cons: it’s stationary and can burn wood if you push too hard, so use light pressure and move the work across the disc to spread heat.
Belt-and-disc combos
Belt-and-disc combo sanders cover two common shop needs: the belt handles longer edges and gentle curves, while the disc handles ends and angles. If you build small furniture or boxes, a combo unit can replace multiple machines for sanding in one footprint, while keeping repeatable geometry with the same fence and table setup.
Other Machines for Sanding (Specialty options)
Orbital sander (sheet/palm)
Sheet/palm orbital sanders use a simple vibrating pattern and standard sheets, which keeps consumable costs low. They work well for light prep on flat boards and paint scuffing, but they can leave visible repeats if your grit is too coarse, so finish with finer sheets and overlap passes.
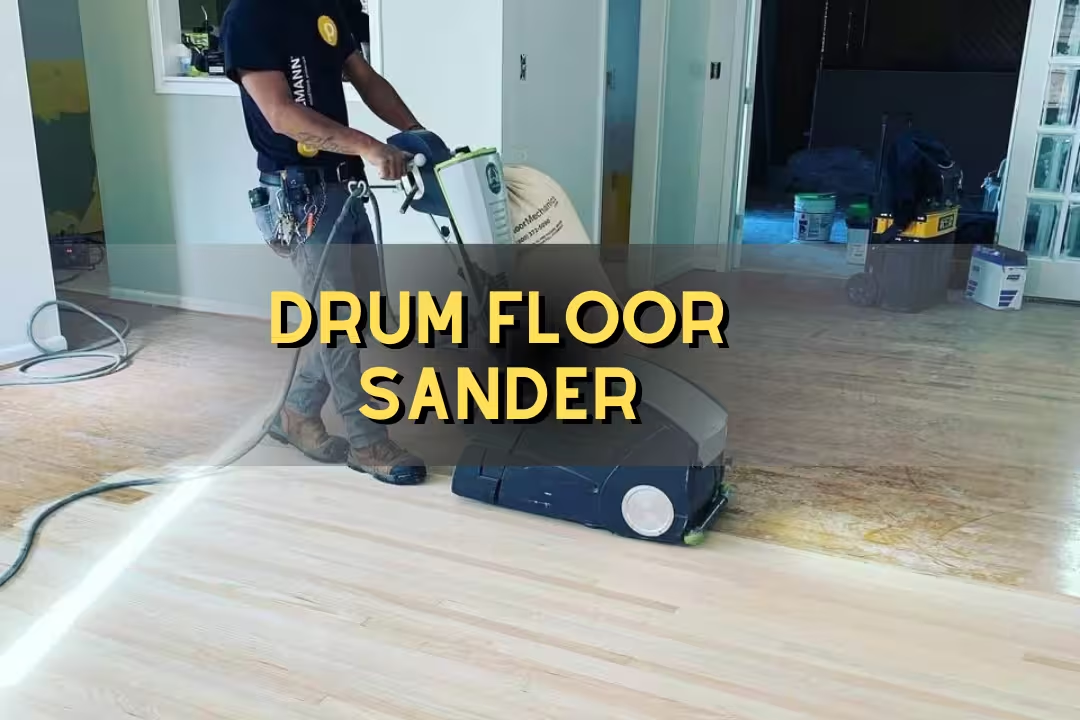
Drum sander
Drum sanders excel at flattening wide panels and thickness sanding with controlled results across the full width. If you process tabletops or cutting boards often, this internal guide to a drum sander explains what to watch for in feed rate, paper loading, and preventing burn marks with steady passes.

JET 16-Inch Drum Sander with Stand
- JET 16-inch drum sander with open stand
- 1½ HP motor for high-performance sanding
- SandSmart load-monitoring system
- adjustable conveyor and precision aluminum drum
- sturdy stand with storage and dust-collection port
Spindle sander
Spindle sanders target curves and inside cutouts with a vertical drum, often with oscillation to reduce scratches and heat. For template work and curved furniture parts, this internal overview of a spindle sander helps you choose drum sizes and match sleeves for clean curves.
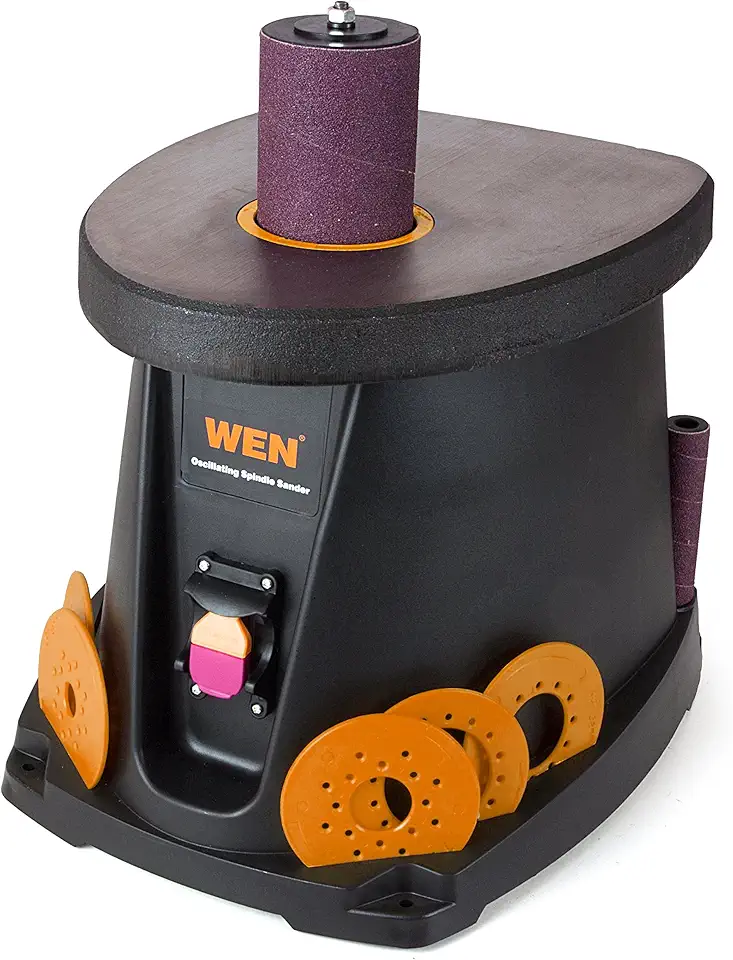
WEN 6510T 3.5A Oscillating Spindle Sander
- Compact footprint fits small shops and benchtops
- 3.5 amp motor provides steady sanding power
- Oscillating action minimizes gouging and heat build-up
- Quick sleeve changes for fast grit swaps
- Dust port helps keep the workspace clean
Safety and Best Practices for Sanding Machines
Dust control
Fine dust is the main risk with machines for sanding, especially on MDF, drywall compound, and old finishes. Connect a vacuum when possible, use perforated abrasives that match your pad holes, and empty dust boxes before they pack solid, which restores airflow and sanding speed.
PPE essentials
Wear eye protection and a properly fitted respirator, then add hearing protection for long sessions and gloves only when they won’t risk entanglement on stationary machines. If you sand painted surfaces from older buildings, treat debris as suspect until tested, and don’t rely on a simple paper mask for fine particulates.
Grit sequence
A grit plan saves time and gives better finishes because each step has a clear job: remove the last grit’s scratches, then stop once they’re gone. Use this simple sequence as a starting point, then adjust based on the coating you’ll apply and how rough raw material looks.
- Heavy leveling (Belt Sander): 40–60, then 80
- General prep (Random Orbital Sander): 120, then 150–180
- Pre-finish on many woods: 220
- Between coats (many film finishes): 320 or a fine finishing pad
- Detail work (Mouse Sander): 120–180, then 220 where needed
Let the abrasive do the work: steady movement and the right grit remove material faster than extra pressure.
Shop sanding rule of thumb
FAQs
What’s The Difference Between A Belt Sander, Random Orbital Sander, And Finishing Sander And When Should I Use Each?
A belt sander removes large amounts of material quickly, a random orbital sander balances material removal and smoothness, and a finishing (pad) sander is for light, final smoothing.
Use a belt sander for heavy stock removal or rough work, a random orbital for general sanding and leveling, and a finishing sander for delicate corners, paint prep, or final passes. Always test on scrap and progress through grits to avoid gouging.
Which Sanding Machine Is Best For Refinishing Hardwood Floors — Drum Sander, Floor Orbital, Or Orbital Buffer?
A drum sander is best for aggressive stock removal and flattening large hardwood floors; a floor orbital (planetary) is safer and better for avoiding gouges, while an orbital buffer is mainly for light polishing and buffing.
Use a drum sander when you must remove deep finish or level cupped boards, choose a floor orbital for most DIY refinishes to reduce risk, and reserve an orbital buffer for final buffing only.
Can I Use A Random Orbital Sander To Remove Old Paint Or Varnish Or Do I Need A More Aggressive Sander?
Yes, a random orbital sander can remove paint or varnish, but it may take longer and require progressively coarser discs compared with more aggressive sanders.
For thick or multiple layers consider starting with a coarser disc or using a belt sander or chemical stripper for stubborn finishes; for thinner coatings, a random orbital with the right grit progression usually works well.
How Do I Choose The Right Grit And Sanding Machine For Furniture Restoration And Avoid Sanding Through The Veneer?
Begin with a coarser grit to level damage then move to finer grits, and use gentle, low-aggression machines or hand sanding near veneer to avoid sanding through thin layers.
Prefer a random orbital with fine grits for most veneer work, test on hidden areas, progress gradually (for example 120 → 180 → 220), and keep light pressure and slow passes to preserve the veneer.