Want to turn rough wood or metal into smooth, useful shapes with fewer mistakes? Good tools make a big difference. This post lists seven lathe tools that cover most projects. You’ll get clear tips on sizes, grinds, sharpening, and basic safety to keep your work steady and safe.
Table of Contents
Lathe tools shape spinning wood or metal by removing material in a controlled way. This guide breaks down the core tools, how to choose sizes and grinds, and how to keep edges sharp and work safe.
Lathe Tools Essentials: What You Need
Lathe tools basics
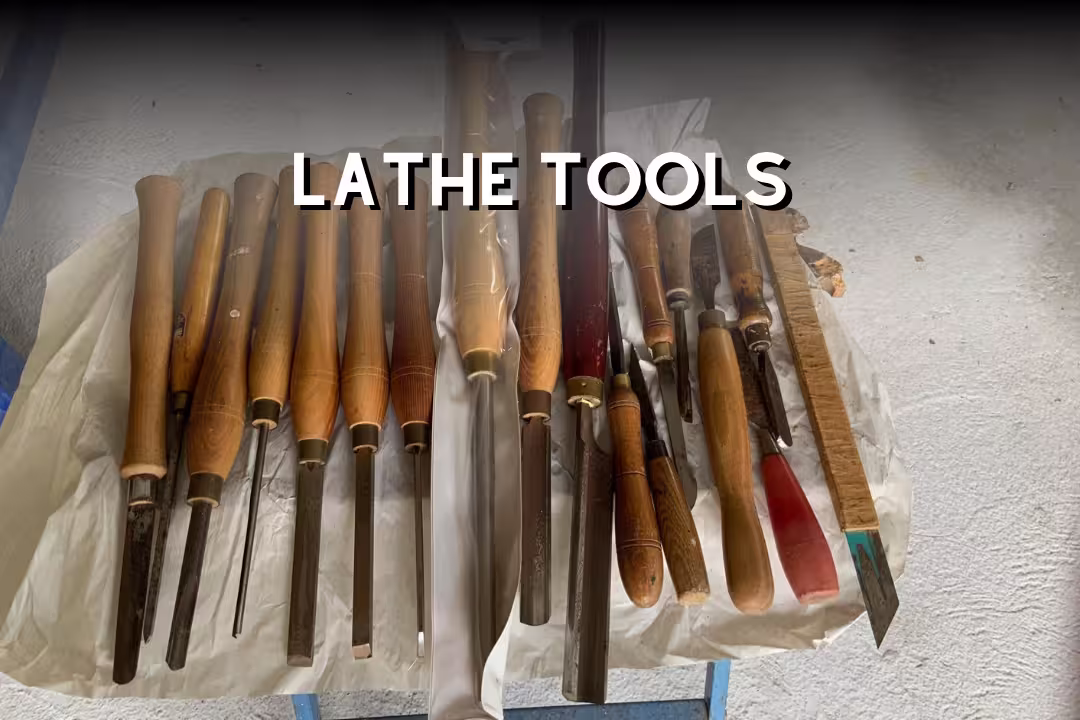
A basic lathe tool set covers rough shaping, detail work, parting, and final surface cleanup, plus a way to measure diameters accurately. Most beginners get the best results by starting with a roughing gouge, spindle gouge, bowl gouge, skew, parting tool, scraper, and spring calipers, then adding specialty cutters after a few projects.
- Roughing gouge: turns square stock to round fast
- Spindle gouge: beads, coves, tapers, and fine details
- Bowl gouge: hollowing and sweeping curves in end grain
- Skew chisel: clean planing cuts and sharp shoulders
- Parting tool: grooves, sizing lines, and cutoffs
- Scraper: truing and final smoothing when grain fights you
- Spring calipers: repeatable diameters without guessing
Match tool length to control: longer handles give more leverage and reduce catches, while short tools feel twitchy on larger work. If you’re setting up a new machine, this overview of a wood lathe setup helps you confirm tool rest height, banjo travel, and spindle clearance before buying extra tooling.
Wood vs metal lathe tooling
Wood lathe tools are usually hand-held and ride a tool rest, so edge sharpness and bevel control matter more than clamping rigidity. Metal lathe tooling clamps into a toolpost and uses set feed rates, so insert geometry, tool height, and chip control matter more than “feel.”
Start with the right method for the material: woodturning favors gouges and skews with keen edges, while metal turning often favors indexable carbide inserts for repeatable cuts. If you plan to turn difficult figured wood, pick stable material early by reading about wood turning blanks and avoiding wet or cracked stock that causes vibration.
| Task | Wood lathe tooling | Metal lathe tooling |
|---|---|---|
| Stock removal | Roughing gouge, bowl gouge | Carbide turning tool holder + insert |
| Detail profiles | Spindle gouge, skew | Finishing insert, form tool |
| Cutoffs/grooves | Parting tool | Parting blade/tool |
| Finish quality | Skew planing + light scraper | Wiper inserts + controlled feed |
| How it’s used | Hand guided on tool rest | Clamped in toolpost |
Roughing Gouge for Fast Stock Removal
Best size
A 3/4-inch roughing gouge is the common “do-most” choice for spindle blanks because it removes wood quickly while staying stable on the rest. Use it for spindle work like mallets, chair rungs, and table legs, then switch to a spindle gouge for tighter curves and clean transitions.
Keep the cut safe by staying on long grain: a roughing gouge is not meant for bowl interiors or faceplate turning where end grain changes direction fast. If you want fewer catches, keep the tool rest close, raise the handle until the bevel rubs, then take shallow passes with steady pressure.
Flute shape
A U-shaped flute is the usual pick for roughing because it clears chips well and supports the edge during heavy cuts. A shallow flute can feel smoother on small spindles, while a deeper flute can hog faster but needs more control to avoid a lever-like catch.
If you’re buying your first set, a multi-tool kit can cover roughing, shaping, and cleanup without guessing profiles. The set below includes several useful starter profiles for early projects. Start simple and upgrade single tools once you know what you reach for most.
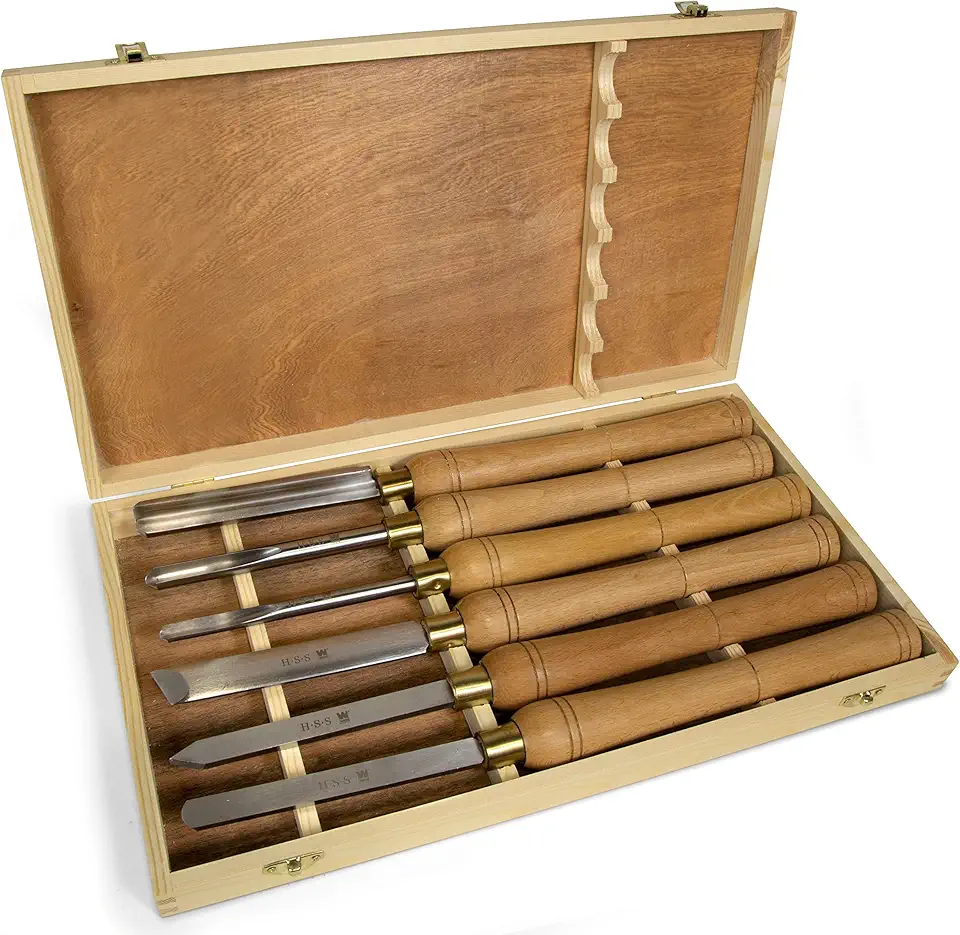
WEN Artisan 6-Piece Chisel Set
- High speed steel 6 inch blades for clean, lasting cuts
- English beech handles about 10 inch for comfortable grip and control
- Balanced tools suited for detailed wood turning and finishing
- Includes a range of profiles for roughing, shaping, and smoothing
- Durable construction for hobbyists and professional use
Spindle Gouge for Details and Profiles
Common cuts
A spindle gouge is your main detail tool for beads, coves, V-grooves, fillets, and flowing tapers. For clean beads, start with the flute slightly open, cut downhill on each side, and meet in the middle so the edge doesn’t pry end grain and tear it out.
For coves, roll the tool while you swing the handle to follow the curve, then stop if you feel vibration starting. On tricky grain like spalted maple, take lighter passes and sharpen sooner because soft pockets crush and leave fuzzy ridges fast.
Beginner size
A 3/8-inch spindle gouge is a safe first size because it reaches tight spots without feeling fragile. Pair it with a 50–70° bevel that you can reproduce consistently; repeatable angles beat “perfect” angles you can’t resharpen the same way twice.
If you want an edge that holds up during long practice sessions, look for M2 high-speed steel and keep a quick touch-up routine. For a clear baseline on HSS properties and why it stays hard at higher temperatures, see NIST for materials references that explain temperature-related behavior in metals.

PSI Woodworking 3/8\
- 3/8″ spindle gouge with M2 high-speed steel blade for finishing and shaping wood
- ideal for lathe spindle work like pens and small projects
- solid hardwood handle with ferrule for control
- comfortable 16″ overall length
- durable and reliable woodworking tool
Bowl Gouge for Hollowing Bowls
Standard size
A 1/2-inch bowl gouge is the common starting point because it has enough mass to stay stable while still fitting smaller bowls. Use it to define the rim, shape the outside, then hollow from the rim toward the center in controlled steps so the wall thickness stays even.
Pick bowl blanks that won’t fight you: straight, sound grain gives cleaner first results, while gnarly figure can grab tools and chip out. If you’re tempted by wild patterns, learn how burl wood behaves on the lathe and plan on sharper tools and lighter cuts.
Grind profiles
A swept-back “Irish” or winged grind gives more options because you can cut with the tip for tight areas or use the wing for shear cuts along the wall. A more traditional fingernail grind can feel easier to control early on because there’s less exposed edge to catch.
The fastest improvement comes from matching the grind to the cut: wings for shear scraping on the outside, a supported bevel rub for interior push cuts, and a closed flute when approaching end grain. For a visual refresher on tool presentation and grain direction, this video can help you spot common mistakes before they become catches.

SIIIXS 1/2\
- High-speed steel bowl/spindle gouge for woodturning
- solid beech wood handle for comfort
- sharp curved blade aids smooth cuts
- 22.4″ overall length with 9″ blade
- ideal for shaping bowls and spindles on a lathe
Skew Chisel for Clean Finishing Cuts
Planing cuts
The skew chisel is the finish maker on spindles because a clean planing cut can leave a surface that needs far less sanding. Start with the skew on its side, rub the bevel first, then ease the edge into the cut using the lower third of the blade so the point doesn’t dig in.
For crisp shoulders, cut a small V as a stop line, then plane up to it with light passes. Keep the handle steady and move your body instead of steering with your wrists, since tiny hand rotations can turn into a catch.
Honing needs
A skew needs frequent honing because the edge quality matters more than raw sharpness on many other tools. Touch it up every few minutes with a flat diamond hone, then go back to the cut before the edge starts compressing fibers.
If you’re choosing a honing option, use a grit that refreshes fast without rounding the edge; a guided routine beats random strokes. This guide on a sharpening stone helps you pick grits and avoid rocking that dulls skews quickly.

Narex Premium Paring Chisel Set
- Six paring chisels for precise hand work
- long thin blades ideal for controlled slicing cuts
- fine grained chrome manganese steel for excellent edge retention
- beveled edges reach tight joints and corners
- comfortable stained beech wood handles with metal ferrules
Parting Tool for Grooves and Cutoffs
Blade style
A diamond-shaped parting tool gives extra clearance, which reduces binding in deeper cuts. A thinner blade parts faster with less waste, while a thicker tool feels steadier for sizing grooves on harder woods where thin steel can wander.
Set the tool rest so the cutting edge hits center, then cut straight in with small pecks to clear chips. If the kerf starts to smoke or squeal, back out, clear chips, and slightly widen the groove with gentle side-to-side movement.
Common use cases
Use the parting tool for sizing lines (repeatable diameters), tenons for chuck jaws, decorative grooves, and final cutoffs. For accurate sizing, cut to just above your target, check with calipers, then sneak up on the final diameter with two or three light passes.
If you want a ready-to-store kit for common woodturning profiles, a boxed set keeps edges protected between sessions. This option includes several profiles that cover roughing through finishing for many beginner builds.

Hurricane 8-Piece Lathe Chisel Set with Case
- High speed steel blades for sharp, accurate cuts and lasting edge life
- Wooden storage box keeps tools organized and protected
- Variety of chisels for roughing, detailing, and finishing work
- Designed for smooth, controlled wood removal and fine detailing
- Good choice for hobbyists and woodworking enthusiasts
Scraper for Final Smoothing and Truing
Burr technique
A scraper works best with a fresh burr edge, not a “knife sharp” bevel. After grinding, raise a burr with a burnisher by making a few firm passes along the top edge; then take light cuts with the tool slightly above center so it doesn’t grab.
Keep the overhang short and the tool rest close, since scrapers can chatter when unsupported. If the surface looks fuzzy, lower your pressure, refresh the burr, and take thinner passes until the wood starts producing fine shavings instead of dust.
Best bevel
A common scraper bevel sits around 50 degrees, which balances edge strength and cut control. For cleaner results, try a slight shear angle by rotating the handle so the scraper edge meets the wood diagonally, then move slowly to avoid heat and burn marks.
Scrapers shine for truing end grain on boxes and flattening small areas that gouges skip over. Use them as a finishing helper, not a replacement for sharp gouge cuts, because heavy scraping can tear fibers and force extra sanding.
Precision Calipers for Accurate Sizing
Measuring diameters
Spring calipers give repeatable sizing while the work is still mounted, which helps when you’re matching tenons, lids, or paired parts. Set them to your target using a ruler or reference part, lock your hand position, then check your turning by gently touching the points to the spinning wood at low speed.
Measure at the same spot each time and keep the calipers square to the axis so you don’t read a false diameter. For better control, stop the lathe for the final checks and use the same light touch so you don’t dent soft woods.
Avoiding overcuts
Overcuts happen when you chase a number and forget tool presentation, so build a habit: cut close, measure, then take one light pass and recheck. If calipers slide on with no resistance, you’ve already gone under size, so stop and adjust the design rather than trying to “put wood back.”
If you want a simple starter set, a three-pack covers small spindles through larger bowls without forcing awkward hand positions.

3-Pack Spring Calipers 8 inch
- Three sizes of outside calipers for versatile measuring on the lathe
- 8 inch length gives extra reach for larger projects
- Carbon steel construction offers durability and edge retention
- Spring tension ensures steady, repeatable measurements
- Ideal for wood turning, layout work, and diameter checking
Lathe Tool Materials, Sharpening, and Safety
HSS vs carbide lathe tools
HSS is a top pick for hand-held lathe tools because it’s tough, resists chipping, and you can resharpen it many times on a grinder. Carbide inserts can last much longer at higher cutting speeds, but they’re more brittle, so a catch can chip them faster than HSS.
The hardness ranges often cited are roughly 62–66 HRC for HSS and 75–94 HRA for carbide, which maps to why carbide holds up in long production runs. If you want a deeper materials reference, Encyclopaedia Britannica’s cutting tool overview gives a clear baseline on tool materials and cutting behavior.
For metal lathe tooling, indexable insert kits make sense because you rotate or swap inserts instead of grinding every edge. Here are a few common kits people compare when choosing shank sizes and insert styles for their toolpost.
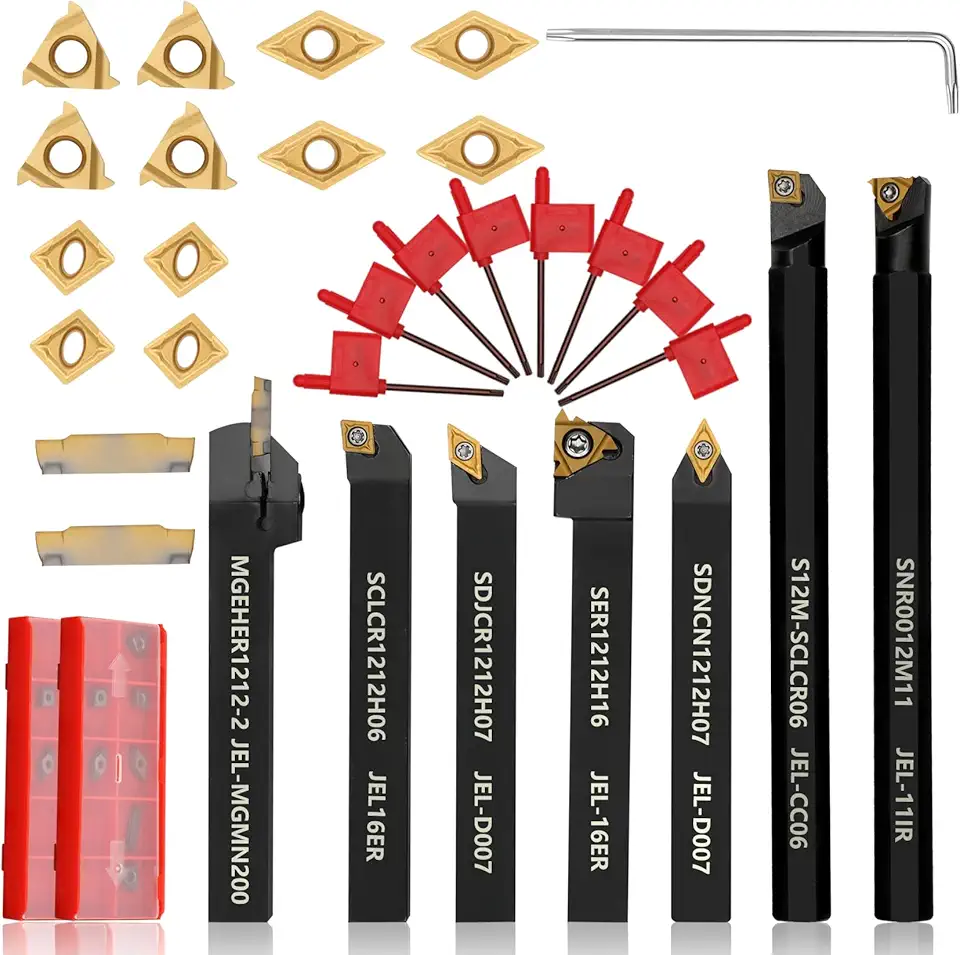
21-Piece Indexable Lathe Tool Kit 1/2 inch
- Includes seven tool holders and fourteen carbide inserts for multiple operations
- 1/2 inch 12 mm shank fits standard metal lathes
- Replaceable inserts make maintenance quick and cost effective
- Suitable for turning, grooving, threading, and boring tasks
- Robust build for extended use in workshop environments
Sharpening and maintenance steps
Sharp tools cut cleaner and feel safer because you use less force. A simple routine keeps you consistent across gouges, skews, and scrapers, and it helps you stop sanding problems before they start.
- Shape the bevel on an 80-grit wheel if the profile is wrong or damaged.
- Sharpen on a 120-grit wheel to refine the edge and remove coarse scratches.
- Hone edges that benefit from it (especially skews) to reduce tearing on finish cuts.
- Refresh often during turning sessions; don’t wait until the tool starts rubbing and burning.
Use a jig for repeatable gouge grinds so your bevel angle stays consistent from session to session. If you want to move from “random grinding” to a repeatable system, follow the angle and grit guidance from your grinder manufacturer and keep a written note of your preferred angles for each tool.
Lathe safety essentials
Start every session with PPE on: a full face shield, eye protection, and a respirator for fine dust. Keep sleeves tight, remove jewelry, tie back hair, and stand slightly off-center during startup in case a blank has a hidden crack.
Set the tool rest about 1/8–1/4 inch from the wood and recheck clearance after each shape change. Keep the cutting edge near centerline, avoid overhanging the tool far past the rest, and stop the lathe before measuring tight areas or adjusting the rest.
Sharp edges, a close tool rest, and a face shield prevent most bad moments before they start.
Common shop practice
FAQs
What Are The Essential Lathe Tools For A Beginner?
The essentials are a small set of turning tools, a parting tool, a dead/live center set, and a 3-jaw or 4-jaw chuck.
Start with 3–4 HSS turning tools in common profiles (round, square, parting) plus one carbide insert for tougher jobs. Also include basic measuring tools (calipers), files, cutting oil, and eye protection.
HSS Vs Carbide Lathe Tools — Which Should I Use And Why?
Use HSS for low-speed, general-purpose work and carbide for high-speed machining or harder materials.
HSS is inexpensive, easy to regrind, and forgiving on small lathes; carbide holds an edge much longer and cuts faster but requires higher speeds and a stiffer setup. Choose based on material, machine rigidity, and how often you want to re-sharpen.
How Do You Sharpen And Set The Correct Geometry For Lathe Cutting Tools?
Sharpen on a bench grinder or diamond wheel to restore the tool’s correct rake and relief angles.
Use a simple jig, angle gauge, or manufacturer template to reproduce geometry and take light, controlled passes to avoid overheating. Set the tool height at the lathe centerline with a gauge or test cut and verify geometry with a light trial cut before full machining.
Which Tool Holders And Tool Posts Work Best For A Mini Metal Lathe?
Compact quick-change tool posts (QCTPs) and low-profile, hardened holders designed for mini lathes work best.
A small Aloris-style QCTP or a 4-way tool post offers rigidity, repeatability, and fast swaps while keeping clearance on small chucks. Use short, stiff holders and match the holder size to your cross-slide to reduce chatter; consider carbide insert holders for consistent results.