
Shiplap Wood Buying Guide: Materials, Costs, Sizes, and Installation

Shiplap wood is wall or siding material formed from boards with overlapping edge rabbets, though many modern products reproduce the look with MDF, plywood, PVC, or adhesive-backed planks. Choosing the right product depends on its profile, installed coverage, moisture rating, finish, fastening method, and full project cost.
Table of Contents
What Is Shiplap Wood?
True shiplap consists of boards milled with overlapping edge rabbets. These joints align neighboring boards and cover the underlying wall, but they don’t make an interior installation waterproof or structurally equivalent to sheathing.
True Rabbeted Shiplap
A rabbet is a stepped recess cut along an edge. True shiplap places rabbets on opposite board faces, so one edge slips over the next; the dry, soft click of two clean profiles fitting together feels different from square boards pushed against spacers.
Traditional boards appeared on barns, sheds, utility buildings, and exterior assemblies. Modern interior shiplap is mainly decorative, and buyers should inspect the profile drawing rather than assume every product labeled “shiplap paneling” has a genuine rabbet joint.
Faux Shiplap Panels
Faux shiplap can be made from ripped plywood, spaced square-edge boards, MDF, PVC, wallpaper, or peel-and-stick wood. It creates the same repeating shadow lines, yet it doesn’t perform like exterior-rated shiplap siding.
Shiplap vs nickel-gap: nickel-gap paneling uses a milled recess or spacing feature to produce a uniform gap. Some retail “shiplap” is technically nickel-gap, so compare profile dimensions and installed reveal before ordering.
Shiplap vs tongue-and-groove: tongue-and-groove boards lock a projecting tongue inside a groove, creating greater edge engagement and often hiding fasteners more effectively. Shiplap overlaps instead; neither decorative profile forms a waterproof wall by itself.
Shiplap vs beadboard: beadboard has narrow grooves or rounded bead details, commonly arranged vertically on wainscoting and porch ceilings. Shiplap uses wider plank lines and often covers full walls, ceilings, islands, or fireplace surrounds.
Compare Shiplap Wood Materials
Pine and MDF suit many painted interiors, while cedar, hardwood, reclaimed wood, PVC, and adhesive-backed panels solve different appearance or exposure needs. No material is automatically suitable outdoors or in a wet area; the product rating controls.
| Material | Best use | Main advantage | Common risk |
|---|---|---|---|
| Pine | Painted interior walls | Affordable and easy to cut | Knot bleed and seasonal movement |
| Poplar | Smooth painted work | Fewer prominent knots | Higher price than basic pine |
| Cedar | Rated exterior or character projects | Natural decay resistance | Tannin stains and fastener reactions |
| White oak | Clear-finished interiors | Strong grain and hard surface | Cost and movement |
| Reclaimed wood | Rustic feature walls | Unique patina | Metal, coatings, pests, uneven thickness |
| MDF or plywood | Painted dry interiors | Consistent dimensions | Swollen edges or visible laminations |
| PVC or composite | Product-approved damp locations | Rot and insect resistance | Thermal movement and heat limits |
| Peel-and-stick | Small prepared interior walls | Fast, tool-light fitting | Adhesive or substrate failure |
Pine and Poplar
Pine boards are light, easy to machine, and widely sold in paint-grade profiles. Low grades may contain checks, pitch pockets, twists, and knots that leave yellow-brown marks through white paint, so seal resinous areas with a stain-blocking primer.
Poplar costs more but has a smoother, quieter grain and fewer obvious knots. That extra material expense can be recovered through less filling and sanding, particularly on crisp white walls where every dent catches side light.
Cedar Shiplap
Cedar wood has useful natural decay resistance and a warm scent that becomes sharp and resinous as it passes through a saw. Select an exterior-rated profile for outside work, seal tannins beneath pale paint, and use compatible corrosion-resistant fasteners.
White oak and hardwoods suit clear finishes where visible grain matters more than low cost. Their density makes cutting slower and fastener holes less forgiving, while seasonal humidity can still open joints or press boards against fixed trim.
Reclaimed wood brings saw marks, nail shadows, sun-faded color, and rough ridges that catch on a cleaning cloth. Scan every board for metal, verify kiln or pest treatment, and test old painted surfaces before cutting or sanding them.
MDF and plywood offer straight, paint-friendly surfaces at a moderate cost. Standard MDF can swell permanently when water enters a cut edge; US buyers should also select composite products meeting EPA TSCA Title VI requirements.
PVC and composites resist rot and insects, but they expand with temperature and don’t feel or repair like natural wood. Follow the maker’s fastening gaps, fire-performance limits, and heat-clearance instructions rather than copying details from pine installations.
Peel-and-stick panels work best on smooth, dry, clean walls. Dust, textured paint, grease, chalky coatings, or weak drywall paper can release the adhesive; firm rolling pressure helps, but mechanical attachment may still be required by the product instructions.
Choose Shiplap by Project
Choose shiplap by exposure before choosing color or species. A dry bedroom accepts many materials, while bathrooms, fireplace walls, porch ceilings, and exterior walls demand location-specific products and installation details.
Living Spaces
Bedrooms and living rooms can use pine, poplar, MDF, hardwood, reclaimed planks, or adhesive-backed panels. Smooth painted boards are easier to dust, while a rough rustic farmhouse surface traps fibers and makes spot cleaning harder.
Horizontal boards make a short wall appear broader. Vertical shiplap draws the eye upward, but it needs horizontal blocking, furring, or a continuous approved substrate when the fastening pattern doesn’t cross wall studs.
Bathrooms and Kitchens
Bathroom shiplap isn’t waterproof. In a shiplap powder room, use ventilation and sealed finishes; near sinks, tubs, or laundry equipment, choose a moisture-tolerant system and keep standard MDF outside splash zones.
Kitchens need a smooth, washable coating that tolerates grease and steam. Painted wood isn’t automatically an approved backsplash behind a sink or range, so verify appliance clearances and local requirements before placing combustible wall panels near heat.
- Ceilings: use mechanical fastening, confirm framing direction, and account for board weight.
- Vertical walls: add horizontal backing or an approved continuous substrate.
- Fireplace walls: follow the fireplace listing and required combustible clearances.
- Exterior walls: use rated siding, flashing, a water-resistive barrier, and corrosion-resistant fasteners.
Shiplap for a porch ceiling must be rated for the sheltered exterior exposure. Moist air and wind-driven rain can reach areas that look protected, causing untreated interior boards to cup or leave dark stains around ordinary steel fasteners.
For fireplace walls, don’t infer safety from a stone-look coating or fire-resistant paint. Wood, MDF, many adhesives, and plastic panels remain combustible materials; clearance depends on the listed appliance and complete surround assembly.
Exterior shiplap siding sheds some surface water through its overlapping profile, but the joint doesn’t replace drainage and flashing behind the cladding. Follow applicable International Residential Code wall-covering provisions, local amendments, and the siding manual.
Appearance and finish also affect maintenance. Wide boards create fewer seams, narrow boards create busier lines, pale paint highlights dark reveals, and natural wood grain patterns make sapwood, knots, and board-to-board color changes more visible.
Maintenance and skill should shape the purchase. Prefinished boards reduce painting but chip easily at saw cuts; unfinished pine requires more preparation, while adhered systems install quickly yet can tear drywall paper during removal.
Shiplap Board Sizes and Coverage
Calculate shiplap from the installed reveal, not nominal board width. A nominal 1-by-6 may measure about 3/4 by 5 1/2 inches before its overlap reduces the visible face, though profiles vary by producer.
Nominal vs Actual Size
Nominal labels describe a size class rather than precise finished dimensions. Compare overall width, reveal width, length, boards per package, and stated coverage; this distinction is explained further in our guide to lumber dimensions.
Installed reveal is the exposed face after neighboring rabbets overlap. Two boards sold as six-inch shiplap may cover different wall areas, which is why price per board gives a weak product comparison.
Coverage Formulas
Use wall width × height for gross square footage. Divide that area by reveal width in feet to find required linear feet, or divide the waste-adjusted area by package coverage and round up to a whole pack.
10-by-8-foot example: an 80-square-foot wall using a five-inch reveal needs 80 ÷ 0.4167, or about 192 linear feet. Add 10% waste to reach 211 linear feet; with eight-foot boards, buy at least 27 boards before adjusting for packaging and seam layout.
Waste allowances run about 5–10% on a plain rectangular wall, 10–15% around several openings or with variable natural wood, and 15–20% or more for diagonal patterns. Keep spare boards from the same batch because later grain and finish matches can be obvious.
Shiplap Wood Cost and Budget
Shiplap wood commonly costs more than finished drywall once boards, waste, trim, coatings, delivery, and labor are included. Compare products by actual package coverage, then build the budget from the complete installed assembly.
Material Planning Ranges
The figures below are planning estimates, not supplier quotes. Species, grade, finish, milling, order quantity, location, freight, and packaging can move prices far outside these ranges.
| Product type | Material planning range | Budget concern |
|---|---|---|
| MDF or basic paint-grade panels | $1.50–$5 per sq. ft. | Primer, paint, and moisture limits |
| Unfinished pine | $2–$8 per sq. ft. | Sanding, knot sealing, and waste |
| Prefinished real wood | $4–$12 per sq. ft. | Cut-edge touch-up and delivery |
| Peel-and-stick real wood | $6–$15 per sq. ft. | Wall preparation and adhesive risk |
| Reclaimed wood | $7–$20+ per sq. ft. | Sorting, metal detection, and treatment |
| Premium hardwood | $8–$25+ per sq. ft. | Harder cutting and finishing |
Additional Project Costs
Allow for fasteners or adhesive, cutting blades, primer, paint, clear finish, corner trim, crown, baseboards, outlet extenders, substrate repair, delivery, and 5–20% waste. Reclaimed boards may also need cleaning, thickness sorting, and metal scanning.
Labor and installed cost may add roughly $3–$10 or more per square foot for installation, with finishing sometimes billed separately. Ceilings, diagonal layouts, tall walls, uneven reclaimed boards, and integrated trim raise setup and cutting time.
Product cost comparison starts with package price divided by actual square-foot coverage. Multiply that result by project area and the waste factor; don’t compare packs or individual boards without checking length, reveal, usable pieces, and freight.
Drywall vs shiplap cost favors standard finished drywall in most new construction. Decorative shiplap adds material and finishing expenses, and it may be fitted over existing drywall rather than replacing required gypsum board, fire protection, or structural bracing.
Shiplap Wood Product Examples
Product listings should be compared by material, profile, board length, installation method, and stated coverage. Confirm indoor or outdoor approval and read the installation sheet before treating marketing terms as technical specifications.
Reclaimed Character
This reclaimed option suits buyers who want irregular grain, weathering, and a rustic farmhouse finish. Check whether the boards are genuinely reclaimed, whether they have rabbeted edges, and whether thickness stays consistent across the pack.

Reclaimed Wood Shiplap Planks
- Authentic reclaimed wood character
- Six-inch-wide shiplap boards
- Creates a warm rustic accent wall
- Ideal for farmhouse-inspired interiors
- Adds natural texture to plain walls
 Buy on Amazon
Peel-and-Stick White Shiplap
This ten-piece pack states coverage of 12.5 square feet. It fits small decorative walls with clean, smooth substrates; divide the waste-adjusted wall area by 12.5 and round up before ordering.

White Peel-and-Stick Shiplap
- Real wood wall planks
- Peel-and-stick installation
- Clean white shiplap finish
- Ten-piece pack covers 12.5 square feet
- Refreshes accent walls with ease
Buy on Amazon
White oak shiplap offers a harder surface and visible American hardwood grain. The stated ten-board package covers 20 square feet, and its 72-inch planks can reduce end joints where the room dimensions suit the length.

White Oak Rustic Shiplap
- Made from real American hardwood
- White oak brings timeless grain
- Rustic shiplap styling
- Ten boards cover 20 square feet
- Long 72-inch planks reduce seams
Buy on Amazon
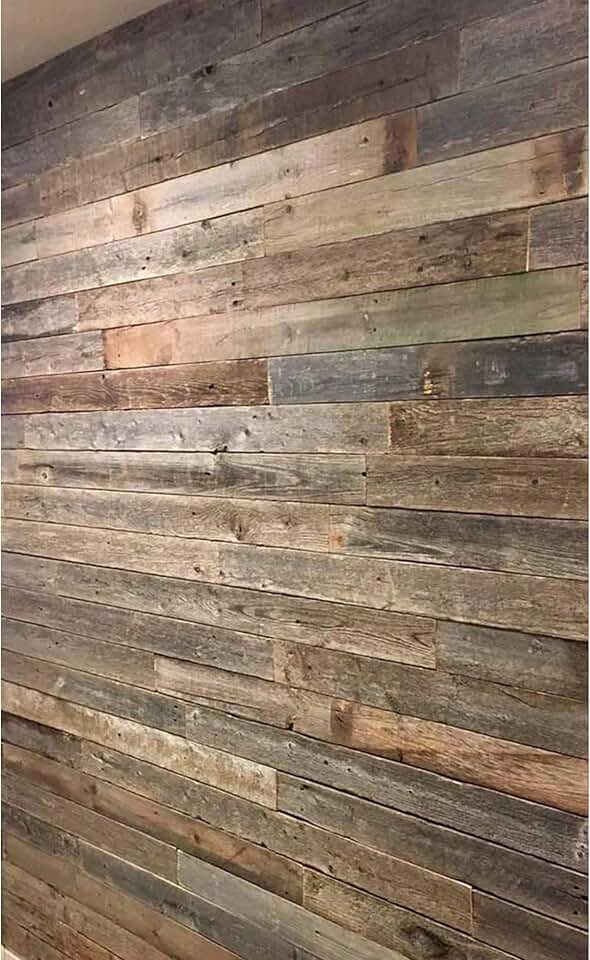
Large reclaimed-wood wall kits reduce the number of packages needed for a broad feature wall. This nail-up product states coverage up to 46 square feet, but barn-wood planks may create the shiplap look without opposing rabbets.
Reclaimed Barn Wood Wall Planks
- Naturally weathered reclaimed wood
- Nail-up wall installation
- Rustic barn wood character
- Covers up to 46 square feet
- Makes a dramatic feature wall
Buy on Amazon
How to Install Shiplap Wood

Shiplap can usually be installed over sound drywall, but boards should attach to studs, blocking, or another approved solid substrate. Successful installation depends on a dry wall, acclimated material, a level layout, movement space, safe electrical detailing, and reliable mechanical fastening.
Wall Assessment and Preparation
Check for active leaks, damp drywall, loose paint, high spots, and deep depressions before covering the wall. Mark studs, pipes, and cables, then photograph their locations; thin planks often follow wall humps, making a shadow line look wavy under side light.
Paint the substrate dark when open reveals might expose pale drywall. Remove dust and grease before using adhesive, and plan added wall thickness around windows, doors, baseboards, electrical boxes, and adjoining trim.
Acclimation and Layout
Store boards flat in the installation room for the maker’s stated period, often at least 48–72 hours. Properly kiln-dried wood can still exchange moisture with indoor air, so don’t fit boards that feel cold, damp, or visibly cupped.
Create a level reference line instead of following a sloping floor or ceiling. Measure the full wall first so the final course doesn’t become an awkward sliver, and place staggered end joints on studs or planned solid backing.
Framing and fastening: finish nails, brads, adhesive, or a combination may suit interior products. Nail into framing or approved backing, follow the stated gauge and spacing, and add blocking where vertical boards run between studs.
Expansion space: solid wood moves across its grain as humidity changes. A concealed perimeter gap around 1/8–1/4 inch is common for decorative interiors, but the manufacturer’s specification takes priority; trim can cover the opening without pinning boards tightly.
Outlets and switches: switch off the circuit before working near electrical boxes. Boxes must remain accessible and correctly positioned at the finished surface; use listed extenders where required and call an electrician for damaged, crowded, or recessed boxes.
Painting and finishing: prime knots and tannin-prone species, then coat faces, cut ends, and edges as directed. Prepainting joint edges prevents raw stripes from appearing when wood shrinks; don’t caulk intentional reveal lines because movement can leave cracked, ragged beads.
Moisture and movement failures: beginners often skip acclimation or wedge boards tightly between walls. Shrinkage then exposes unfinished edges, while rising humidity can make courses buckle, cup, or press hard enough to open trim joints.
Adhesive and fastener failures: adhesive can release from dust, glossy paint, texture, damp drywall, or unstable paper. Interior brads may lack holding strength on ceilings or hardwood, and unprotected steel can leave orange or black stains in cedar and exterior wood.
Exterior waterproofing errors: rabbeted boards aren’t a drainage plane. Exterior work needs rated siding, proper clearances, flashed openings, a water-resistive barrier, compatible fasteners, sealed cuts, and any required rainscreen space behind the cladding.
Practical notes from real-world use. Sort every natural board before starting, placing the straightest pieces at eye level and saving bowed stock for short cuts. Dry-fit three courses at once: fingers can feel a proud joint before the eye sees the shadow-line error, and correcting it early prevents the defect from repeating up the wall.
FAQs
What Kind Of Wood Is Best For Shiplap?
Pine is the most popular and affordable wood choice for shiplap walls. It is lightweight, easy to cut, and accepts paint or stain well. MDF is a smooth budget-friendly alternative for dry rooms, while cedar or PVC boards are better choices where moisture is a concern.
How Much Shiplap Wood Do I Need For A Wall?
Measure the wall height and width, then multiply them to find the total square footage. Add 10 to 15 percent extra material for cuts, mistakes, and unusable boards. Subtract the area of large windows or doors if you want a more precise estimate before buying lumber.
Can Shiplap Be Installed Directly Over Drywall?
Yes, shiplap can usually be installed directly over drywall. Locate and mark the wall studs so the boards can be securely fastened with nails or screws. Use construction adhesive only as extra support, since fastening into studs provides the strongest and most durable installation.
Is Shiplap Wood Suitable For Bathrooms?
Shiplap can be suitable for bathrooms when it is properly sealed, painted, and ventilated. Use moisture-resistant wood, MDF designed for humid spaces, or PVC shiplap away from direct water exposure. Avoid installing standard unfinished wood inside showers or other areas that stay consistently wet.
Do You Paint Shiplap Before Or After Installation?
Painting shiplap before installation makes it easier to cover the gaps between boards. Apply at least one coat before hanging the boards, then touch up nail holes and cut edges afterward. Painting after installation also works, but it takes more care to reach every seam evenly.
Affiliate Disclosure: Some links in this post are affiliate links. If you make a purchase through these links, we may earn a small commission at no extra cost to you. We only recommend products we genuinely believe in.